How to Create a Gallery Wall - Your Complete Guide to Picture Perfect Displays
Published: 21 July 2025
Right, let's talk about gallery walls. You know that feeling when you're staring at a blank wall, knowing it needs something but not quite sure where to start? We've all been there. Creating a gallery wall might seem like one of those Pinterest-perfect projects that only interior designers can pull off, but honestly? It's much more achievable than you think.
What Exactly Is a Gallery Wall (And Why You Need One)
A gallery wall is basically your chance to turn a boring blank wall into something that actually tells your story. Think of it as a curated collection of artwork, photos, prints, maybe even that quirky mirror you picked up at a car boot sale, all arranged together to create one cohesive display.
Here's the thing: unlike hanging a single piece of art (which, let's face it, can feel a bit... lonely?), a gallery wall gives you flexibility. You can mix family photos with that abstract print you love, throw in a vintage map from your travels, and somehow make it all work together. It's brilliant, really.
The best part? You don't need a massive budget or an art degree to create something stunning. Though I'll admit, plenty of people get stuck before they even start. They worry about getting the spacing wrong, putting too many holes in the wall, or ending up with something that looks more "charity shop explosion" than "curated collection."
Let me walk you through exactly how to avoid those pitfalls.
Choosing Your Art and Frames (Without Going Broke)

Finding Your Theme Without Overthinking It
First things first: gather everything you might want to include. Seriously, just pile it all on the floor. Old family photos, postcards from that trip to Barcelona, your kid's artwork, whatever speaks to you. If you're working with digital photos, consider getting them professionally printed in a cohesive layout - nothing kills a gallery wall faster than mismatched print qualities. Now, step back and look for connections.
Maybe you'll notice loads of blue tones running through your pieces. Or perhaps they're all black and white except for that one vibrant sunset photo (which could actually become your focal point). You might discover you've unconsciously collected lots of nature scenes, or that geometric patterns keep popping up.
The trick is finding those threads without forcing it. Your gallery wall should feel collected over time, not like you bought a matching set from Ikea (though between you and me, there's nothing wrong with mixing in a few Ikea finds).
Getting Frames Without Breaking the Bank
Let's be honest about frames for a second. They can be stupidly expensive, can't they? Walk into any high street framing shop and you'll walk out wondering if the frames are made of gold. But here's what savvy decorators know:
Charity shops are goldmines. I'm not joking. Some of my best frames came from Age UK and cost less than a fiver each. Sure, they were different colours originally, but a can of spray paint sorted that right out. Matt black, white, or metallic gold can unify the most random collection of frames.
Mix investment pieces with bargains. Maybe splurge on one or two really nice frames for your most special pieces, then fill in with budget options. Nobody's going to inspect each frame individually, trust me.
Think beyond traditional frames. Clipboards make brilliant frames for a modern look (especially for A4 prints). Washi tape can create faux frames directly on the wall (perfect for renters). Even vintage book covers or record sleeves can become part of your display. Square formats like 10x10" or 12x12" look particularly striking in minimal frames or even frameless with clips.
As for what goes in those frames? High-quality prints of famous artworks are freely available online. Your own photos can look incredibly professional when printed properly - and if you want museum-quality prints without the hassle, Pik.so makes it dead simple to create stunning photo arrangements that arrive ready to frame. Heck, I've even framed pages from beautiful old books I found at jumble sales. One person's damaged book is another person's art supply.
Planning Your Layout (The Part That Trips Everyone Up)

The Measurements That Actually Matter
Okay, deep breath. This is where people usually panic, but I promise it's not complicated. You just need to know a few key numbers.
First, the magic number: 57 inches. That's how high the centre of your gallery should be from the floor. Why? It's average eye level, and galleries worldwide use this standard. Your wall, your rules, obviously, but it's a solid starting point.
For spacing, here's what works: leave about 2-3 inches between smaller frames, and 3-4 inches between larger ones. Too close and everything feels cramped. Too far apart and you lose that cohesive gallery feel. It's like personal space for pictures, really.
When working with standard print sizes (A4, A3, or square formats like 10x10" and 12x12"), you can create beautiful geometric patterns. Pik.so offers these exact sizes as single prints - perfect for building a cohesive gallery wall whether you want them framed, printed, or as digital downloads to print yourself.
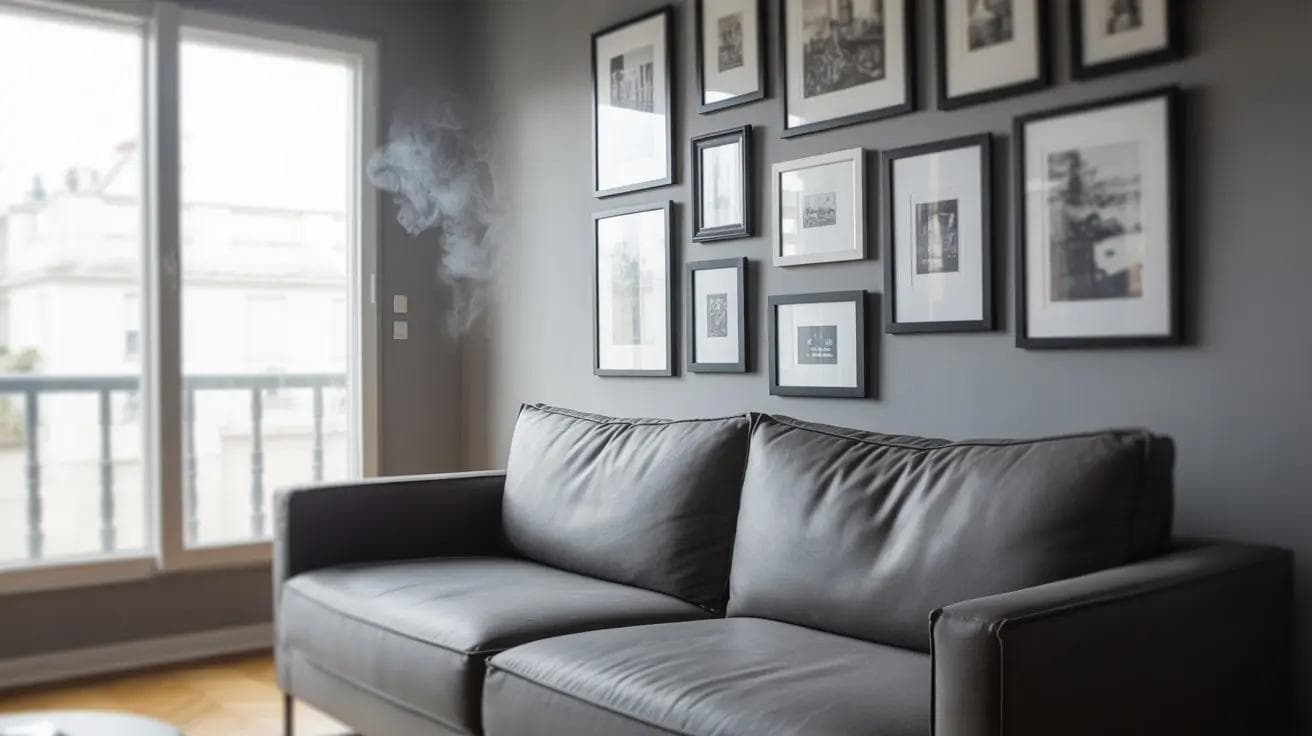
And size-wise? Your gallery should cover about two-thirds to three-quarters of the wall space. Above a sofa? Aim for roughly two-thirds the sofa's width. It creates balance without overwhelming the space.
Paper Templates: Your Secret Weapon

Here's my favourite trick, and it's dead simple. Before you pick up a hammer:
- Trace each frame on brown paper or newspaper
- Cut them out and label them (trust me, you'll forget which is which)
- Arrange them on the floor first - or try Pik.so's layout templates if you want to see how your photos look in different arrangements before printing
- Stick them to the wall with masking tape
- Live with it for a day or two
I know it sounds faffy, but this method has saved me from so many wrongly placed nail holes. Plus, you can move things around endlessly without any commitment. My husband thinks I'm mad when I'm shuffling paper around the wall, but who's laughing when the final result looks spot-on?
Special Situations: Small Spaces and Staircases
[Staircase wall with framed photos following the diagonal line of the stairs, consistent spacing between frames, mix of black and white family photos]
Small spaces need a different approach. Instead of spreading out, think vertical. A tall, narrow arrangement draws the eye up and makes the room feel larger. Or try turning a corner – seriously, gallery walls don't have to stick to one flat surface.
Staircase galleries are trickier but so worth it. The key is maintaining consistent spacing from the handrail (usually 3-4 inches) and hanging each piece level with the floor, not the stairs. Start at the bottom and work your way up. Take breaks to walk down and check how it looks – you'll spot wonky frames much easier from a distance.
Actually Hanging Everything (Without Having a Meltdown)

What You'll Need
Before you start hammering away, gather your tools:
- Measuring tape (obviously)
- Pencil (not pen – learned that the hard way)
- Spirit level (or download a level app on your phone)
- Hammer
- Picture hooks (get a variety pack)
- Masking tape
- Maybe a glass of wine (optional but recommended)
The Step-by-Step That Actually Works
Step 1: Clean your wall. I know, boring. But dusty walls mean things might not stick properly during planning, and you'll kick yourself later.
Step 2: Find your centre point. Measure the wall, mark the middle with a tiny pencil dot. This is your North Star.
Step 3: If you're using the paper template method (which you should be), now's when you finalise placement. Pro tip: put your largest or most eye-catching piece slightly off-centre. Dead centre can look a bit... dead.
Step 4: Time for the fidgety bit. For each frame, measure from the top to where the hanging wire or hook sits when pulled taut. Transfer this measurement to your wall marks.
Step 5: Hanging hardware depends on your walls. Standard plasterboard? Picture hooks are your friend. Old Victorian walls that crumble when you look at them? Pre-drill holes. Heavy pieces? Find a stud or use proper wall anchors.
Step 6: Start with your anchor piece (usually the largest or most central), then work outwards. After every few pieces, step back. Then step back further. Take a photo with your phone – sometimes camera view reveals spacing issues your eyes miss.
For Renters: No Damage, No Drama
Renting doesn't mean living with blank walls. Command strips are brilliant for lighter frames. Picture ledges let you swap displays without new holes. Or go rogue and lean larger pieces against the wall on a console table or even the floor. Very art gallery chic, that.
Making It Look Expensive (When It Definitely Wasn't)

The Frame Colour Mixing Formula
Mixing frame colours scared me for years. Then I learned about the 60-30-10 rule. Use one frame colour for 60% of your frames, a second colour for 30%, and a pop of something different for the remaining 10%.
So maybe mostly white frames, some natural wood, and one or two gold ones for sparkle. Or predominantly black with some white and a surprise navy blue. It looks intentional rather than random.
Working with Your Room
Your gallery wall shouldn't exist in isolation. Look around the room:
- What colours keep appearing in your cushions, rugs, or curtains?
- Is your style minimal or maximalist?
- What's the wall colour doing? (Dark walls make light frames pop dramatically)
Pull at least one colour from your existing décor into your gallery. It ties everything together like magic.
Lighting (The Bit Everyone Forgets)

Good lighting transforms a nice gallery wall into a spectacular one. You don't need fancy picture lights (though they do look swish). A strategically placed lamp, some fairy lights, or even just considering natural light patterns makes a massive difference.
Just remember: direct sunlight fades photographs and prints. If your wall gets blasted by afternoon sun, either choose that spot for less precious pieces or invest in UV-protective glass.
Your Burning Questions Answered
"What's the easiest way to plan a gallery wall?" Paper templates, hands down. Yes, it takes time upfront, but it saves hours of fixing mistakes later.
"How many frames should I use?" There's no magic number, but odd numbers (5, 7, 9) often look more dynamic than even ones. Start with 5-7 pieces – you can always add more later.
"What layout works in a small space?" Grid patterns are your friend in small spaces. Clean, organised, maximum impact. Or try a tight cluster of 3-5 pieces.
"Can I mix frame colours?" Absolutely! Just follow that 60-30-10 rule I mentioned. It's foolproof.
"What tools do I actually need?" Bare minimum: measuring tape, pencil, level, hammer, and picture hooks. Everything else just makes life easier.
Brilliant Budget Tips Nobody Tells You
Where to Find Affordable Frames
Online: Wait for sales. Sign up for newsletters. Buy frame sets when they're discounted. Check Facebook Marketplace and eBay for people decluttering.
Offline: Car boot sales on Sunday mornings. Charity shops in posh areas (trust me on this). Pound shops for basic frames you can jazz up. End-of-season sales at craft shops.
Money-Saving Tricks That Work
- Standardise sizes – Buying five 8x10 frames is cheaper than five different sizes. Consider using standard sizes like A4 or A3 for easy frame shopping
- Print smart – Many libraries offer cheap printing services, or use professional printing services like Pik.so for consistent quality across all your prints. They offer digital downloads too if you prefer printing locally
- Seasonal shopping – Post-Christmas sales are brilliant for frames
- Frame swapping – Change artwork, not frames, to refresh your wall
DIY Ideas That Don't Look DIY
Cut your own mounts from white cardboard – way cheaper than custom matting. Spray paint transforms any frame. Mix in mirrors or small shelves between frames for dimension. Use vintage books, maps, or botanical prints from charity shops.
Time to Get Started
Look, creating a gallery wall isn't about perfection. It's about surrounding yourself with things that make you smile, tell your story, or just fill that annoying blank space above the sofa.
Start simple. Choose pieces you love. Follow the spacing guidelines (but don't obsess over them). Use templates to avoid disasters. And remember – you can always move things around later. Gallery walls should evolve with you.
The wall's waiting. That hammer's not going to swing itself. And I promise, once you step back and see your finished gallery wall, you'll wonder why you waited so long to start.
Now go make something brilliant. Your walls deserve it. Create gallery wall at Pik.so